Showing posts with label Chapter Excerpts. Show all posts

Wednesday, August 6, 2008

1: About the Stevia Plant


Following is an excerpt from Growing and Using Stevia: The Sweet Leaf from Garden to Table with 35 Recipes.

Stevia Plant Description

Stevia rebaudiana is a fascinating plant, native to higher altitudes of Paraguay and Brazil in South America. Stevia is the genus, meaning a broad classification of plants. Rebaudiana is the species name. When we say “Stevia,” we are referring to this particular species. Only this species, out of the many found in the Americas, contains the high concentration of sweet glycosides making this “sweet leaf” such a useful and amazing herb.

There seems to be something about the Stevia’s glycosides that, despite their appeal to our taste buds, makes many insects loathe to dine on the leaves. Perhaps Stevia rebaudiana developed this high concentration of glycosides as an adaptation to protect itself from insect attack.

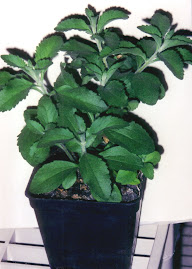
Stevia is not a particularly showy plant. Its sweet taste is its most notable feature. It is a non-woody herb, with somewhat stiff and brittle stems. Leaves are small and narrow, notched on the end. Leaves are sweeter than stems. Plants started from seed generally feature larger leaves than plants started from cuttings. Plants usually reach a height of around 24–30 inches (61-76 cm) under cultivation. Older plants can send up new shoots from underground. Stevia blossoms are white and tiny, but so numerous that plants look like greenish-white clouds when in bloom. It is a tender perennial herb, meaning it survives winters and keeps growing, but only where winters are mild, such as subtropical regions like Florida, the gulf coast, and coastal California. Stevia roots will generally not survive under about 25° F. (−4° Celsius).

Stevia and Day Length

Fortunately, Stevia may be grown as an annual— planted every year—where cold winters prevent perennial production. Even when grown as perennials, plants should be replaced every few years since they tend to weaken with time. There are advantages to growing Stevia at higher latitudes, closer to the poles. It has to do with the longer summer day lengths—more hours of sunlight.

(continued below)


Stevia is a “short day” plant which means it blooms as days grow shorter in late summer or fall. In northern Missouri (around 40° north latitude), most Stevia plants don’t bloom until late September or early October. This is when days are finally short enough to trigger blossoming. It means seeds will not ripen outdoors before a killing freeze. But it also means plants can grow all summer with long daylight conditions. Long days have the opposite effect that short days do. They encourage lots of leaf growth rather than blossoms, resulting in higher leaf yields and a higher concentration of sweet glycosides in those leaves. More temperate regions, then, are great for leaf production, but subtropical regions allow for a longer growing season, perennial culture, and outdoor seed production.

See Chapter 1 of Growing and Using Stevia for this additional topic:


  • Stevia in The Wild

Order your copy of Growing and Using Stevia: The Sweet Leaf from Garden to Table with 35 Recipes through one of these links:

directly from Prairie Oak Publishing
from Amazon.com.

###

2: Outdoor Stevia Culture and Soil


Following is an excerpt from Growing and Using Stevia: The Sweet Leaf from Garden to Table with 35 Recipes.


Stevia will grow on most garden soils, but prefers sandy loam or loam, high in organic matter. Stevia generally wants to be treated like other herb or vegetable crops, but is a little more sensitive to drying out on one hand and water-logging on the other. Stevia tolerates a wide range of soil pH. Its native soils are on the acid side.

Keys to growing Stevia include the following:


  • compost/organic matter

  • raised beds for heavy soil

  • consistent soil moisture

Garden Soil

A good way to improve heavy, high clay soil or light, sandy soil is to dig or till in good compost . Various composts and composted manures are available for purchase or you can make your own. In most cases, good compost will be the only fertilizer needed.

If your soil forms hard clods when it dries after a rain and standing water is slow to drain, Stevia plants probably won’t be happy there. Raised growing beds can help the situation. Raised beds are great for improving drainage in heavy soils and will help prevent soil compaction.

See Chapter 2 of Growing and Using Stevia for these additional topics:


  • Making Compost

  • Building Raised Growing Beds

  • Stevia Fertilization

  • Transplanting Stevia Plants to the Garden

  • Garden Location

  • Timing for Transplanting Stevia in Cold Winter Areas

  • Timing for Transplanting Stevia in Frost-Free Areas or Greenhouses

  • Timing for Transplanting Stevia to Grow Under Artificial Lighting

  • Timing for Transplanting Stevia Near the Equator

  • Stevia Plant Care

  • Watering Stevia in the Outdoor Garden

  • Prunung Stevia in the Outdoor Garden

  • Perennial Stevia Production Outdoors (where climate allows)

Order your copy of Growing and Using Stevia: The Sweet Leaf from Garden to Table with 35 Recipes through one of these links:

directly from Prairie Oak Publishing
from Amazon.com.


###

3: Stevia Houseplants


Following is an excerpt from Growing and Using Stevia: The Sweet Leaf from Garden to Table with 35 Recipes.

Stevia can be a challenging houseplant during the short days of winter because it wants to go to seed with short day lengths. Artificial lighting helps tremendously, however.

Plants can be held over from one season to the next and even produce leaves for use during the winter. Overwintered plants can also be a source for taking cuttings in late winter or early spring.

With a large pot like the one pictured in the photo (10 inch diameter), a stevia plant can be kept permanently potted for a few years, moved outside on the deck or patio when the weather allows.

See Chapter 3 of Growing and Using Stevia for these additional topics:


  • Overwintering Outdoor Stevia Plants

  • Watering Stevia Houseplants

  • Potting up Stevia Plants to Bigger Pots

  • Fertilizing Stevia Houseplants

  • Potting Soil

  • Lighting for Stevia Houseplants

  • Stevia Houseplants in the Spring


Order your copy of Growing and Using Stevia: The Sweet Leaf from Garden to Table with 35 Recipes through one of these links:

directly from Prairie Oak Publishing
from Amazon.com.


###

4: Stevia Propagation by Cuttings

Following is an excerpt from Growing and Using Stevia: The Sweet Leaf from Garden to Table with 35 Recipes.

If you are a more advanced gardener, you might want to try your hand at propagating your own Stevia plants from cuttings. Here’s what you’ll need:

· A mother plant, potted or in the garden, from which to take cuttings
· Fluorescent shop light (if indoors)
· Coarse horticultural vermiculite or other coarse medium
· Small pots or cell packs with bottom holes (if indoors)
· Solid dish or tray for bottom watering (if indoors)
· Container with clear cover for humidity (optional)
· Drip hose (if outdoors)
· Sharp knife or razor

Stems root easily in late winter or spring when two key conditions are met. First, at least 14 hours of fluorescent or natural light per day seems to encourage quick rooting. Secondly, the rooting medium should be coarse horticultural vermiculite, perlite, or another coarse potting material. Use pots or cell packs with holes in the bottom and water from below as needed to maintain a constantly moist medium. Periodic misting or a clear covering may be helpful when the air is especially dry. The clear plastic “clamshell” boxes that hold lettuce or prepared pineapple from the grocery store work well for a small number of plants (see fig. ). They come complete with clear plastic lids, forming a “mini-greenhouse." Leave lid ajar to allow some air flow. Remove cover when plants begin to grow.

The mother plant from which cuttings are taken may be one that was kept over winter, or an outside garden plant. Cuttings often root simply by inserting them into the ground near a drip hose where they will have constantly moist soil. This only works in the spring or summer when days are long.


(continued below)


Use a sharp knife or razor to make a clean, slanting cut. One long shoot can be sliced into several smaller cuttings. Each cutting should be 3–5 inches (8–13 cm) in length. Remove the larger leaves. Gently insert cuttings into the vermiculite with the end that was closer to the base of the plant pointed down into the vermiculite or soil. The end that was further from the base should be pointed up. At least two leaf buds should remain above ground (leaf buds are at the axis where older leaves attach to the stem). Lower leaf buds, with the older leaf cut off, may be buried.

After 2–4 weeks, cuttings should develop several roots, possibly poking out from the drainage holes. Throw out any cuttings that wither and die or fail to produce roots. Transplant successful cuttings to a larger pot with regular potting soil and keep as potted plants or allow to grow another 2–4 weeks before transplanting outdoors.

See Chapter 4 of Growing and Using Stevia for these additional topics:

  • Caring for Stevia Cuttings
  • Outdoor Propagation from Cuttings

Order your copy of Growing and Using Stevia: The Sweet Leaf from Garden to Table with 35 Recipes through one of these links:

directly from Prairie Oak Publishing

from Amazon.com.

###

5: Stevia Propagation from Seed


Following is an excerpt from Growing and Using Stevia: The Sweet Leaf from Garden to Table with 35 Recipes.

Starting Stevia From Seed

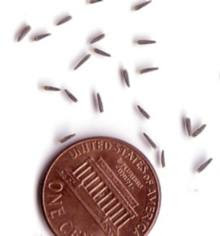
Stevia is fairly easy to start from seed as long as the seeds are good. In the past, Stevia has usually been started from cuttings because it was hard to find seeds with germination over 50%. In conducting a research project at Northwest Missouri State University, I found black or dark seeds are consistently more viable. By separating out black or darker colored seeds, a germination rate of 80%–90% is common. Good Stevia seeds are now available. Sources are listed in the appendix.

Seeds not planted within a few weeks should be stored in a rubber-sealed glass jar or vial. For long term storage, place a little dry silica gel with the seeds—preferably the beaded kind. Silica gel is usually treated so it is blue when dry and turns pink when saturated. Beaded silica gel can be dried on a cookie sheet in an oven on low heat, with the door ajar. Keep sealed seeds in a cool room out of direct sunlight or in your refrigerator. When stored this way, good seeds retain viability for many years. Stevia seeds from our own plants retained most of their germination ability after seven years of low humidity, low temperature storage. Seeds stored at room temperature and humidity dropped from 90% germination at harvest to 75% germination 7 months later.

Sow seeds indoors in early spring, or any time if you plan to keep plants indoors or in a greenhouse with artificial light. Transplants should be transferred to the garden at least two weeks after your usual last frost date (we usually transplant about mid May here in Missouri—USDA zone 5). Plants reach a good transplant size after about 8–10 weeks.

If you already have a favorite method for starting seeds indoors, it should work fine for stevia. Just keep in mind that exposure to light helps germination slightly. Otherwise, requirements are similar to those for tomatoes.

See Chapter 5 of Growing and Using Stevia for these additional topics:

Seeds Storage
Shopping List for Stevia Seed Starting
Directions for Starting Stevia Seeds
Timing
Filling Pots
Stevia Seed Selection
Stevia Seed Planting
Lighting, Humidity, and Warmth
Watering Stevia Seedlings
Pruning and Transplanting Stevia Seedlings


Order your copy of Growing and Using Stevia: The Sweet Leaf from Garden to Table with 35 Recipes through one of these links:

directly from Prairie Oak Publishing
from Amazon.com.


###

6: Harvesting Stevia


Following is an excerpt from Growing and Using Stevia: The Sweet Leaf from Garden to Table with 35 Recipes.

When it comes to harvesting, the obvious method is grazing in the Stevia patch. Just pinch off a leaf and enjoy. It’s even better when combined with a mint leaf. With a little more effort, you can use those fresh leaves to make a tea with a tea ball or strainer just as you would make any herb tea.Harvest time really arrives when plants are fully grown. You’ll get the highest leaf yield just as plants start blooming in the late summer or fall. When the first blossom buds form, go ahead and harvest.

See Chapter 6 of Growing and Using Stevia for these additional topics:


  • Drying Leaves
  • Storing Dried Leaves


Order your copy of Growing and Using Stevia: The Sweet Leaf from Garden to Table with 35 Recipes through one of these links:

directly from Prairie Oak Publishing
from Amazon.com.

###

Tuesday, August 5, 2008

7: Processing Stevia Leaves


Following is an excerpt from Growing and Using Stevia: The Sweet Leaf from Garden to Table with 35 Recipes


Whole Dried Stevia Leaves are ready for making herbal tea alone or in combination with other herbs. Mint or chamomile leaves go nicely with Stevia. Most herbal teas are better with the addition of Stevia leaves. Whole Dried Stevia Leaves may be purchased if you run out of home-grown leaves. Check the appendix for sources. If you feel a little more ambitious, following are a couple of ways to make further use of homegrown or purchased Dried Stevia Leaves. Recipes in chapter 9 make use of Stevia Leaf Water Extract and Green Stevia Powder


Stevia Leaf Water Extract yields about ½ cup extract

This liquid extract is made from dried leaves. Alcohol or glycerin extracts are available for purchase, but we prefer this water extract which keeps about a week in the refrigerator.

· ½ cup Dried Stevia Leaves, packed in the measuring cup
· 1 cup water

Bring water to a simmer in a small saucepan. Small bubbles should come to the surface. Stir in Dried Stevia Leaves, turn off heat, and cover the pan. Steep 40 minutes. Store in a very clean glass jar. Cover with a lid and refrigerate. Use within a week.

(continued below)


Green Stevia Powder yields about 1/3 cup powder

The most versatile Stevia product from homegrown plants, you’ll find recipes using Green Stevia Powder in this book and more in “Stevia Sweet Recipes: Sugar-Free―Naturally!” by Jeffrey Goettemoeller. Green Stevia Powder is also available for purchase at some natural food stores or online (see appendix).

· 2 cups Dried Stevia Leaves, packed down in the measuring cup

Place dried stevia leaves in a blender bowl and cover while blending on high speed for 30 seconds. Leave bowl covered a few minutes, allowing dust to settle inside. Remove cover and stir with a rubber or plastic spatula, then put cover back on and blend another 30 seconds at high speed.

Alternatively, this first step may be done with a flour sifter or mortar and pestle, in the absence of electricity or an electric blender. With a flour sifter, put in a handful of leaves at a time, cover, and turn the handle until most leaf material has disintegrated and fallen through the screen. Throw out any remaining leaf veins or debris. When using a mortar and pestle, thoroughly grind a few leaves at a time.

Regardless of the grinding method, the powder may be used in recipes at this point if desired, or sift through a tea strainer to remove larger particles still remaining. This removes some tough leaf veins that resist dissolving and don’t taste as good.

For long term storage, put the powder in a glass jar with a tight lid and keep in a dark place. It stores at least 2 years this way without flavor loss. Short term, Green Stevia Powder may be stored in a re-closeable plastic bag kept in a dark location. In general, 3–4 teaspoons of Green Stevia Powder replace a cup of refined sugar.

Order your own copy of Growing and Using Stevia from these vendors:

Click here to order directly from Prairie Oak Publishing.
Click here to order from Amazon.com.
###

8: Stevia in the Kitchen

Following is an excerpt from Growing and Using Stevia: The Sweet Leaf from Garden to Table with 35 Recipes.

Stevia is available for purchase in the following forms:

· Dried Stevia Leaves (whole dried leaves)
· Green Stevia Powder (powdered leaves)
· Liquid Stevia Extracts (alcohol, glycerin, or water-based)
· Stevia Extract Powder (extract of glycosides)

Here we are primarily concerned with Dried Stevia Leaves, Green Stevia Powder, and Stevia Leaf Water Extract, since these can be made right in your kitchen from homegrown or purchased Stevia leaves (see chapter 7) and then used in the recipes in chapter 9.
Unlike aspartame, Stevia is heat stable. This means it works in a variety of dishes when the recipe is properly designed. Dry Stevia products also have a long shelf life.

Certain issues present a challenge when cooking with Stevia. Very little is required due to its tremendous sweetness. Bulk that would normally be provided by sugar must instead be supplied by other dry ingredients. Also, some way must be found to distribute Stevia evenly through the other ingredients.

Another challenge is the taste of Stevia itself, especially with Green Stevia Powder and Liquid Stevia Extract. Stevia is a natural sweetener with its own unique flavor, just as honey and sorghum have their own flavors. This is not a problem if the ingredients are adjusted and selected so they interact harmoniously with Stevia. In fact, Green Stevia Powder can act as a flavor enhancer at times, bringing out the flavors of other ingredients.

Dried Stevia Leaves

Whole dried leaves may be purchased (see appendix) or grow your own! Either way, they make a sweet and delicious herbal tea. Stevia leaves enhance the sweetness and flavor of most other tea herbs when mixed together. Dried Stevia Leaves are also the raw ingredient for making other stevia products. Dried Stevia Leaves may be stored at room temperature in an airtight jar out of the sunlight. They will keep well this way for at least 3 years.

Green Stevia Powder

Green Stevia Powder consists of Dried Stevia Leaves which have been finely ground. It can be made in the kitchen from homegrown or purchased leaves (see chapter 7). Green Stevia Powder contains the full range of nutrients found in Stevia. It does present some challenges, with its green color and stronger taste. It doesn’t work in just any recipe, but works well in many of the recipes found in chapter 9.

Store Green Stevia Powder in a glass jar with a tight lid and keep in a dark place at room temperature. It stores at least 2 years this way without loss of quality. A re-closeable plastic bag kept in a dark location will be adequate for short-term storage.

Conversion rate: A good rule of thumb is to use 3–4 teaspoons of Green Stevia Powder in place of 1 cup refined cane sugar. But the conversion rate varies greatly depending on the recipe.

(continued below)


Liquid Stevia Extracts

Liquid extracts are convenient for sweetening beverages and some other dishes. Most liquid extracts on the market have an alcohol or glycerin base to extend shelf life. Stevia Leaf Water Extract can be used in some of the recipes in chapter 9 and may be made in your own kitchen from dried leaves by following the directions in chapter seven (p. 43). Stevia Leaf Water Extract can be kept in the refrigerator for about a week.

Stevia Extract Powder

Most Stevia recipe books, including Jeffrey’s Stevia Sweet Recipes: Sugar-Free—Naturally!, call for pure Stevia Extract Powder, which must be purchased. The extraction process is beyond what you would want to tackle at home. This white or off-white powder is an extract of the sweet glycosides in the Stevia plant. Because of their unique structure, these glycosides don’t contribute calories to the diet. The main glycosides are stevioside and rebaudioside A. Stevia Extract Powder contains 80–95% glycosides. The term “stevioside” is used by some authors as a collective term for all the glycosides found in the Stevia plant.

We prefer a pure Stevia product, with no maltodextrin or other fillers. These fillers may not be tolerated by those who must avoid easily metabolized carbohydrates, and the pure Stevia Extract Powder is almost always a better buy in terms of sweetening power for your money. Additionally, some fillers dissolve poorly.

Conversion rate: We find that one teaspoon of Stevia Extract Powder has roughly the sweetening power of one cup refined cane sugar, though the conversion rate varies depending on the ingredients with which it is combined.

Order your own copy of Growing and Using Stevia from these vendors:

Click here to order directly from Prairie Oak Publishing.

Click here to order from Amazon.com.
###